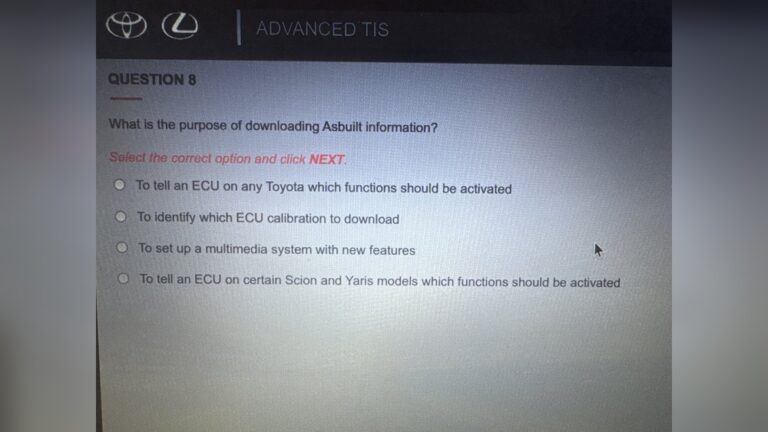
How to Change a Thermostat on a 2014 Chevy Silverado: Easy Guide
If your 2014 Chevy Silverado is not heating up properly or is overheating, the thermostat might be the problem. Changing the thermostat can save you time and money compared to a costly mechanic visit.
In this guide, you’ll learn step-by-step how to replace your thermostat quickly and safely. By the end, you’ll feel confident handling this repair on your own and keeping your truck running smoothly. Ready to get started? Let’s dive in.
Tools And Materials Needed
Changing the thermostat on a 2014 Chevy Silverado needs some basic tools and materials. Having the right items ready saves time and avoids frustration. This guide lists everything needed for a smooth repair.
Tools Required
You need a socket wrench set with extensions to reach tight spots. A flathead screwdriver helps remove clamps and covers. A torque wrench ensures bolts are tightened correctly. Pliers are useful for hose clamps. A drain pan catches coolant. A funnel makes refilling coolant easier.
Materials Needed
Get a new thermostat designed for the 2014 Chevy Silverado. Use a new gasket or O-ring to prevent leaks. Fresh coolant is important to refill the system after the change. Clean rags help wipe spills and keep the workspace tidy. A small scraper removes old gasket residue.

Credit: www.amazon.com
Locating The Thermostat On A 2014 Chevy Silverado
Finding the thermostat on a 2014 Chevy Silverado is the first step in replacing it. The thermostat controls the engine’s temperature by regulating coolant flow. Knowing its location helps you perform repairs safely and quickly.
The thermostat sits near the engine’s front. It connects to the upper radiator hose. This hose carries hot coolant from the engine to the radiator.
Open The Hood And Locate The Radiator
Start by opening the truck’s hood. Stand in front of the vehicle. The radiator is a large metal part behind the front grille. It cools the engine coolant as air passes through.
Find The Upper Radiator Hose
Look for a thick black hose at the top of the radiator. This is the upper radiator hose. It runs from the radiator to the engine block. The thermostat is housed where this hose meets the engine.
Identify The Thermostat Housing
The thermostat housing is a small metal or plastic case. It connects directly to the engine and the upper radiator hose. It usually has a few bolts holding it in place. This housing contains the thermostat inside.
Removing The Old Thermostat
Start by draining the coolant to avoid spills. Then, remove the bolts holding the old thermostat in place. Carefully take out the old thermostat and clean the surface before installing the new one.
Gathering Necessary Tools
Start by collecting the right tools to remove the thermostat. You will need a socket wrench, screwdrivers, and a drain pan. Having these ready saves time and effort.
Wear gloves to protect your hands from hot coolant or sharp parts. Safety first.
Draining The Coolant
Place the drain pan under the radiator drain valve. Open the valve carefully and let the coolant flow out. This prevents spills when removing the thermostat housing.
Close the valve after draining. Proper disposal of old coolant is important for the environment.
Locating The Thermostat Housing
Find the thermostat housing by tracing the upper radiator hose to the engine. The housing is where the hose connects to the engine block.
Clean the area around the housing to avoid dirt falling inside. A clean workspace helps avoid problems later.
Removing The Thermostat Housing
Use the socket wrench to remove the bolts holding the housing. Keep the bolts safe for reassembly.
Gently lift the housing off the engine. Some coolant may spill, so keep the drain pan handy.
Taking Out The Old Thermostat
Pull the old thermostat straight out of the engine. Note its position to install the new one correctly.
Remove the gasket or seal carefully. Clean the surface before installing the new thermostat to ensure a good seal.

Credit: www.youtube.com
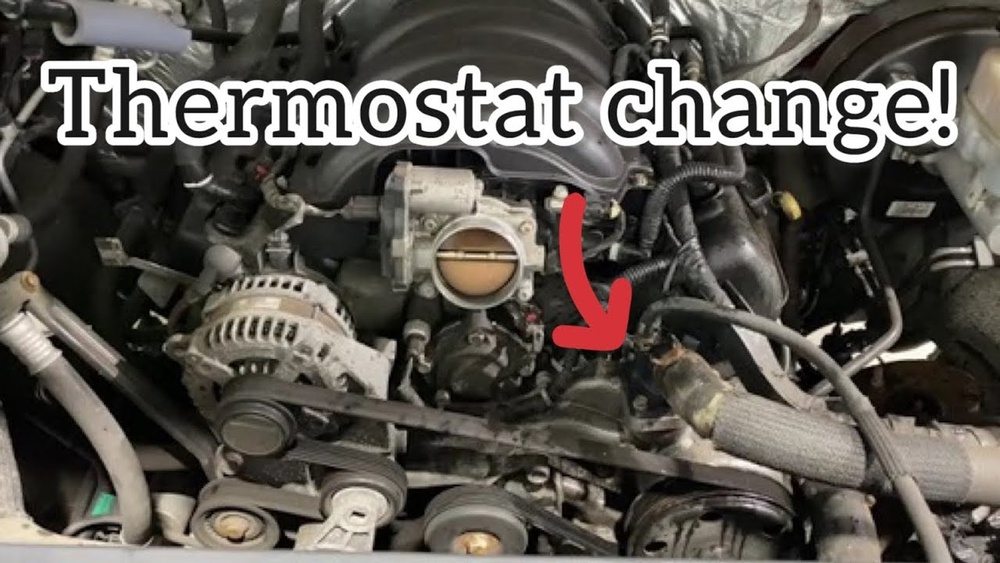
Installing The New Thermostat
Installing the new thermostat in your 2014 Chevy Silverado is a key step to ensure your engine runs at the right temperature. This part controls coolant flow, so proper installation is important. Follow these steps carefully to avoid problems and keep your truck in good shape.
Preparing The New Thermostat
Start by checking the new thermostat. Make sure it matches the old one in size and shape. Look for a rubber gasket or seal included with it. This seal prevents leaks. If the seal is missing, find one that fits perfectly before installing.
Placing The Thermostat Correctly
Position the thermostat in the housing with the spring side facing the engine. This placement helps the thermostat open at the right temperature. Align it carefully so the gasket sits evenly. Avoid shifting it during installation to prevent leaks.
Securing The Thermostat Housing
Put the thermostat housing back over the new thermostat. Insert the bolts by hand to avoid cross-threading. Tighten the bolts evenly in a crisscross pattern. Use a torque wrench if possible to reach the right tightness. This step prevents damage and leaks.
Refilling Coolant And Checking For Leaks
Refill the coolant reservoir with the correct type of coolant. Start the engine and let it warm up. Watch for leaks around the thermostat housing. Check the temperature gauge to ensure the engine heats properly. Stop immediately if you spot any leaks.

Credit: www.amazon.com
Frequently Asked Questions
How Do I Know If My 2014 Chevy Silverado Thermostat Is Bad?
A bad thermostat can cause engine overheating or poor heating. Look for temperature fluctuations or coolant leaks around the thermostat housing.
What Tools Are Needed To Change The Thermostat On A Silverado?
You will need a wrench, screwdriver, drain pan, and a new thermostat kit. Having gloves and safety glasses helps protect you during the job.
How Long Does It Take To Replace The Thermostat On A Silverado?
Replacing the thermostat usually takes about 1 to 2 hours. This depends on your experience and available tools.
Can I Change The Thermostat Without Draining All The Coolant?
You can drain just enough coolant to lower the level below the thermostat. This prevents a full coolant system drain and saves time.
What Steps Should I Follow To Install A New Thermostat Correctly?
Remove the old thermostat and clean the gasket surface. Install the new thermostat with the spring side facing the engine, then reattach the housing and refill coolant.
Conclusion
Changing the thermostat on your 2014 Chevy Silverado is a straightforward task. With the right tools and steps, you can do it safely and quickly. This helps keep your engine cool and running well. Take your time and follow each step carefully.
Avoid rushing to prevent mistakes. Regular maintenance like this saves money on repairs later. Now, you can feel more confident handling basic car repairs yourself. A working thermostat means your truck stays comfortable and reliable on the road. Give it a try and enjoy the results.