How to Check Alternator by Disconnecting the Battery: Quick Guide
Is your car’s battery not holding a charge, or are you hearing strange noises from under the hood? You might be facing an alternator problem.
But how can you be sure without spending money at the mechanic first? The good news is, you can check your alternator yourself by simply disconnecting the battery. It’s easier than you think, and doing this quick test can save you time, stress, and money.
Keep reading, and you’ll learn exactly how to do it step-by-step, so you can take control of your car’s health today.
Credit: www.fridayparts.com
Safety Precautions
Checking the alternator by disconnecting the battery requires care. Safety is the top priority to avoid injury or damage. Follow these safety steps before starting any work on your vehicle’s electrical system.
Wear Protective Gear
Always wear safety glasses to protect your eyes. Gloves help protect your hands from sharp parts and electric shocks. Wear clothes that cover your skin to avoid burns or cuts.
Ensure Vehicle Is Off
Make sure the engine is completely off before disconnecting the battery. Remove the keys from the ignition to prevent accidental starting. This stops electric current from flowing during your work.
Avoid Electrical Hazards
Disconnect the negative battery terminal first to reduce short circuit risks. Keep metal tools away from battery terminals to prevent sparks. Never touch both battery terminals at the same time with your bare hands.
Credit: speedalternators.com
Tools Needed
Checking your alternator by disconnecting the battery needs a few basic tools. These tools help you work safely and get accurate results. Having the right equipment makes the process simple and clear.
Multimeter
A multimeter measures electrical voltage and current. It shows if your alternator charges the battery properly. Choose a multimeter that is easy to use and has clear readings. Set it to measure DC voltage before testing the battery and alternator.
Wrenches
Wrenches loosen and tighten battery terminals. Use the correct size to avoid damage. A small adjustable wrench works well for most battery posts. Make sure you can safely disconnect the battery without stripping bolts or nuts.
Insulated Gloves
Insulated gloves protect your hands from electrical shocks. They also prevent accidental short circuits. Choose gloves made for electrical work with proper insulation. Always wear them when handling the battery and alternator connections.
Steps To Disconnect Battery
Disconnecting the car battery is an important first step before checking your alternator. It helps prevent electric shocks and protects your vehicle’s electrical system. Follow these simple steps carefully to disconnect the battery safely.
Locate Battery Terminals
Open the car hood and find the battery. Look for two metal terminals on top. One will have a plus (+) sign, the other a minus (–) sign. The plus terminal is positive. The minus terminal is negative.
Disconnect Negative Terminal First
Use a wrench to loosen the nut on the negative terminal. Remove the cable from the battery terminal. This stops electricity flow and lowers the risk of sparks. Never disconnect the positive terminal first.
Secure Loose Cables
After removing the negative cable, move it away from the battery. Use a cloth or tape to cover the metal end. This prevents accidental contact with the battery or metal parts. Keep the cables secure before working on the alternator.
Credit: jerry.ai
Testing The Alternator
Testing the alternator is a key step after disconnecting the battery. It helps confirm if the alternator is working right. The process is simple and uses basic tools. Follow each step carefully to get accurate results.
Reconnect Battery
First, reconnect the battery terminals securely. Make sure the connections are tight and clean. This restores power to the car’s electrical system. Without this, the alternator cannot be tested properly.
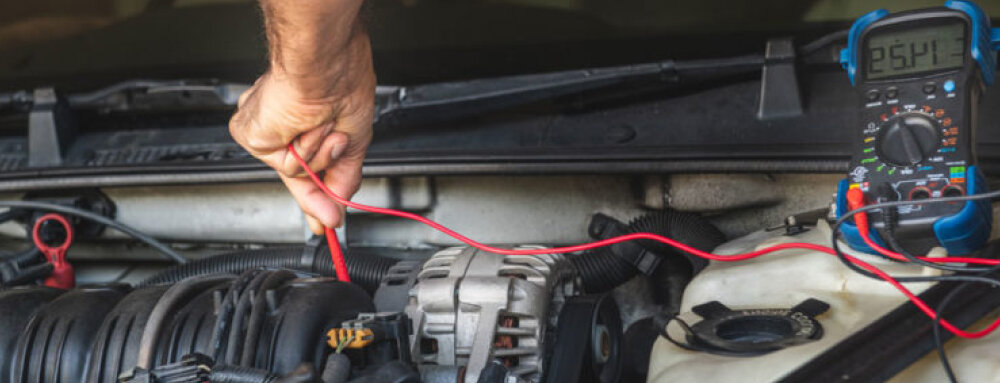
Measure Voltage Output
Use a digital multimeter to measure voltage. Set the meter to DC volts, usually 20V range. Place the red probe on the positive battery terminal. Place the black probe on the negative terminal. Start the car and let it run at idle. Check the voltage reading on the meter display.
Interpret Test Results
A healthy alternator typically shows 13.8 to 14.8 volts. Voltage below 13.5 volts means the alternator may be failing. A reading above 15 volts can mean an overcharging problem. If the voltage is outside this range, have a mechanic inspect the alternator. This test quickly shows if the alternator needs repair or replacement.
Frequently Asked Questions
How Do You Check An Alternator By Disconnecting The Battery?
Disconnect the battery to prevent electrical shocks. Start the car and watch the dashboard lights. If lights stay on or flicker, the alternator may be faulty.
Can Disconnecting The Battery Damage The Alternator?
No, disconnecting the battery briefly does not damage the alternator. It is a safe way to test if the alternator is charging properly.
What Signs Show A Bad Alternator During Battery Disconnect Test?
If the engine stalls or the car dies after disconnecting the battery, the alternator likely isn’t working well. Also, dimming lights are a common sign.
How Long Should The Battery Be Disconnected To Test The Alternator?
Only a few seconds are needed after starting the engine. Longer disconnection might cause the car to shut down or damage electrical parts.
Is It Safe To Disconnect The Battery While The Engine Runs?
It is generally safe but not recommended for modern cars. Some cars have sensitive electronics that can get damaged by this test.
Conclusion
Checking your alternator by disconnecting the battery helps find charging issues. This simple step shows if the alternator works well or not. Always follow safety rules to avoid accidents during the test. Knowing how to check your alternator saves time and money on repairs.
Keep your car running smoothly with regular checks like this one. A small effort can prevent bigger problems later on. Stay safe and keep your vehicle in good shape.